Wednesday, May 29, 2019

How to get really Quick and Easy Text Effect in GIMP


Hi Everyone, In this video I'm gonna show you How to get text effect in most quickest way possible in GIMP

Note:
GIMP is an free Alternative for Photoshop. Hence you can try this same method in Photoshop as well.

Steps:
1. Open GIMP
2. Drag and Drop the Subject Image
3. Remove Background
4. Add a Black Background Layer
5. Move Background Layer below the Subject Layer
6. Duplicate the Background layer and Move above the Subject layer
7. Hide the Top Layer and make the Subject Layer Active
8. Grab Text Tool
9. Click and Drag the Text Box to fill the Complete Canvas
10. Select the Impact Condensed Font or any other your favorite fonts
11. Make sure your font size is small
12. Change the Font Color to White
13. Make the gap between the line = -3
Make the gap between the letters = -2
14. Now Write Down the Text inside the Text Box until it is completely filled
15. Now hide the Text layer
16. Make the Subject Layer Active and Desaturate it
17. Increase the Contrast of the Image using Levels
18. Now Make the Top Layer Visible
19. Make the Text Layer Active and do Alpha to Selection on that layer
20. Make the Top Layer Active and Press Delete on your Keyboard
21. Select None

That's it. Thanks for Watching
Make Sure to Like, Share and Subscribe


Double Light Fantasy Effect - GIMP


Hi Everyone, In this video I'm gonna show you how to Create a Double Light effect using the Open source Image Editing Software called GIMP.

Note:
GIMP is an Alternative for Photoshop. Hence you can try this same method in Photoshop as well.

1. Open GIMP
2. Drag and Drop your Subject's Image
3. Remove background

4. Desaturate the Subject Layer
5. Use Levels to Increase Contrast
6. Select Free Select Tool
7. Select Face Region
8. Now Subtract the Eye, Eyebrow and Mouth from Selection
9. Add 2px feather to the Selection
10. Give Gaussian Blur to approximately like I have given in this video
11. Add a New Transparent Layer
12. Add a Black Background
13. Again do Gaussian Blur the Subject Layer with Small value
14. Scale the Subject Layer to make the face mostly in the Canvas
15. Now Drag and Drop this Light Bokeh Image

16. Scale the Light Bokeh Layer
17. Change the Mode to Lighten Only
18. Go to Colors - Hue and Saturation
19. Make Lightness to -100
And Saturation to -45
20. Create a New Transparent Layer
21. Select any Foreground Color you want
22. Fill the New Layer with that Color using Bucket Fill Tool
23. Change the Mode to Overlay
24. Duplicate the Layer
25. Change its Mode to Subtract
26. Add Layer Mask to Layer #1
27. Select Blend Tool
28. Drag from the Left End of the face to Right End in Layer Mask with Black as Foreground Color
29. Add Layer Mask to Layer #2
30. Drag from Right End to Left End of the Face
31. You can also change the two Colors by changing the Colors in Layer #1 and Layer #2 using Bucket fill Tool

That's it. Thanks for Watching
Make sure to like, Share and Subscribe

GIMP Tutorial - Cracked Face Effect


Hi Everyone, In this video I'm gonna show you how to create a cracked face using the open source Image Editing software called GIMP.

Note:
GIMP is an alternative for Photoshop. Hence you can try this same method in Photoshop as well.

1. Open GIMP
2. Open the Subject Image with GIMP
3. Drag and Drop the Cracked Image

4. Add Alpha Channel to the Cracked Layer
5. Scale the cracked layer using Scale Tool
6. Rotate it to fill the Face and Neck portion of the Subject
7. Use Move Tool to Position the Layer
8. Hide the Cracked layer
9. Duplicate the Subject Layer
10. Desatuarate the Duplicated Layer
11. Increase the Contrast of the Image
12. Give Gaussian Blur
13. Make the Cracked Layer Visible and Active
14. Hide the Black and White Layer
15. Make the Cracked Layer to Image Size
16. Go to Filters - Map- Displace
17. Make the X and Y Displacement Value to 10
18. Then Choose the Black and White Subject Image for X and Y Displacement
19. Change the Cracked Layer Mode to Multiply
20. Add layer mask to the Cracked Layer
21. Select Paint Brush Tool
22. With Black as the Foreground Color brush it over the Layer Mask to erase the cracks on the region other than face and neck
23. Erase the Cracks in Lips and Eyes
24. Duplicate the Cracked Layer
25. Change the Mode to Overlay
26. Reduce the Opacity to 60-70

That's it. Thanks for Watching
Thumbs up if this video helped you. Share with your friends
Subscribe for more Tutorials

GIMP Tutorial - Torn Paper Effect


Hi Guys, In this video I'm gonna show you how to create a Torn Paper or Ripped Paper Effect using the Open Source Software called GIMP.

Note;
GIMP is the Alternative for Photoshop. Hence you can try this same method in Photoshop as well

Steps:
1. Download Torn Paper Image

2. Open it with GIMP
3. Open your Subject Image in GIMP
4. Remove its Background
5. To remove Background for Complex Images
*Using Path Tool

*Using Layer Mask

6. Scale the Image to focus only the Subject's face using scale tool
7. Use Move Tool to Position the Image
8. Make the Layer to Image Size
9. Create a New Layer with Black Color
10. Move the Black Layer down in the Layer Dialog
11. Duplicate the Subject Layer
12. Desaturate the Duplicated Layer
13. Merge Down the Colored Subject Layer with the Black Layer
14. Copy the Torn paper Image and paste it as New Layer
15. Position the Paper Layer using Move Tool
16. Add a New Transparent Layer
17. Move the Layer below the black and white layer
18. Pick the Color from the paper
19. Fill the New Layer with that Color using Bucket Fill Tool
20. Merge down the Black and White Subject Layer with the Paper Color Layer
21. Make the Paper Torn Layer Active
22. Choose Fuzzy Select Tool
23. Click Inside Torn Paper Region to select it Completely
24. Now Make the B/W Subject layer Active
25. Simply Press Delete on your Keyboard
26. Make the Torn Paper Layer Active
27. Script Fu - Layer Effects - Drop Shadow

That's it.
Thanks for Watching. Thumbs up if you like this video
Make sure to Subscribe this Channel for more Tutorials

How to Create Graffiti in GIMP


Hi Everyone, This is Daniel from f&D in this video I'm gonna show you How to create a Graffiti style word art in the wall using the Open Source Software called GIMP.

Note:
GIMP is the Alternative for Photoshop. Hence you can try this same method in Photoshop as well

Steps:
1. Download any wall Image from the Internet
2. Download any Graffiti Font and Install it on your Computer
//Most Wazted Font

3. Open the wall Image in GIMP
4. Write down the words inside the Image using the Downloaded Graffiti Font
5. Make the text layer Active
6. Change the Foreground and Background Color for Gradient Overlay
//For Layer styles Watch this video

7. Go to Script Fu - Gradient Overlay
8. Change the Gradient to 'FG to BG (RGB)'
9. Then Click OK
10. Then go to Script Fu - Stroke
11. Change the Size to 10
12. Stroke from Outside
13. Go to Script Fu - Inner Shadow
14. Change the Color, Opacity, Angle and Distance
15. Go to Script Fu - Outer Glow
16. Change the Color , Opacity, Spread and Size
17. Then Go to Filters - Map - Bump Map
18. Then Select the Wall Image
19. Change the Blending Mode to Hard Light or Grain Merge

That's it. Thanks for Watching
Make sure to Like, Share and Subscribe

How to Create Brick Wall Portrait in GIMP


Hi Everyone, In this video I'm gonna show you how to transform a normal photo into a brick wall portrait using the Open Source Image Editing Software called GIMP.

Note:
GIMP is the Alternative for Photoshop. Hence you can try this same method in Photoshop as well.

Brick Wall Image


Steps:
1. Open both the Subject and Brick wall Image Seperately in GIMP
2. Remove the Background of the Subject and Make it Transparent
3. Copy the Subject Layer and paste it on the Brick wall Image
4. Give Stroke to the Appropiate size according to your Subject layer Size
5. Duplicate the Brick Wall Portrait
6. Desaturate it and use Curves to give more Contrast
7. Give Gaussian Blur a little bit
8. Make the Subject layer Active and Go to Filter - Artistic - Cartoon
9. Give Necessary Values
10. Change its Mode to Overlay and Reduce its Opacity to 90
11. Duplicate the Subject layer and Reduce its opacity to 60
12. Move the Subject Layer little bit to the left
13. Go to Filters - Map - Displace
14. Select B/W Brick Wall Layer to the X and Y Displacement
15. And give the value - 5 to the X and Y Displacement
16. Leave others as it is
17. Create New from Visible
18. Give some Perspection to the Image using Perspective Tool (Optional)
19. Create a New layer
20. Select gradient tool
21. Choose gray color
22. Press and Drag the Mouse from the right to the Middle of the Image
23. Make its Mode to Burn and Change its Opacity to 30

That's it. Now you got that Brick painting portrait

Thanks for Watching. Make sure to thumbs up.
Share the video to the GIMP Communities. Don't forget to Subscribe for Future Videos

Disintegration/ Dispersion/ Pixel Explosion Effect - GIMP Tutorial


Hi Everyone, In this video I'm gonna show you How to create Dispersion/ Disintegration/ Pixel Explosion Effect in GIMP

Note:
GIMP is the ALternative for Photoshop. Hence You can also try this same method in Photoshop as well.

Steps:
1. Open an Image
2. Draw the Path around the Subject using Path Tool
3. Make the path into Selection
4. Cut the Selection
5. Paste as New Layer
6. Create a New White Layer for Background
7. Duplicate the Subject layer (Warp Layer)
8. Place it Between the Subject and Background layer
9. Go to Filter - Distorts - iWarp
10. With Move tool distort the Image
11. Add Layer Mask with Black for Warp Layer
12. Add Layer Mask with White for Subject Layer
13. Select Paint Brush
14. Choose any Splatter Brush (Splats 01 in this tutorial)
15. Brush the edges in Subject Layer Mask with Black as the Foreground Color to remove the Edges
16. Make the Foreground Color as White
17. Brush in the region to get the distorted image back in Warp Layer's Layer Mask

That's it.

Thanks for Watching. Thumbs up, Share and Subscribe

Swap Faces in GIMP


Hi Everyone, In this video I'm gonna show you How to face swap in GIMP. That is changing one person's facial features into someone else.

Note:
GIMP is the Alternative for Photoshop. In photoshop there are lot more easier ways to do a face swap. For example using seamless blending technique. You can also try this same method in photoshop as well.

Steps:
1st Step: Changing Facial Features
*Make a selection of eye, nose and mouth from the one's face
*Copy it
*Paste it on the Another one's face
*Watch full technique in the video
2nd Step: Matching Skin Color
* Watch from
06:31 to get know how to match skin color

Things I forgot while creating this Video tutorial:
1. Revealing original color to the eye after matching skin color
2. Adding Shadows to the Right Eye
3. Using Smudging tool to the edges of the facial features after finishing every steps

Thanks for Watching
Thumbs up, Share and Subscribe


CARICATURE Tutorial - GIMP


Hi Everyone, In this video 'm gonna show you How to create a Caricature from a photo using the open source Image editing software called GIMP

Note:
GIMP is the Alternative for Photoshop. Hence you can try this same method in photoshop as well.

Steps:
Majority of the time we are going to use IWarp funtion in GIMP. Which is the alternative for Photoshop's Liquify Tool. There are different function inside IWarp i.e Move, Shrink, Grow, Remove, Swirl CW, Swirl CCW
In that we will mostly use move to create a caricature from a photo. Watch the video to know the Complete Technic to create.


Double Exposure Effect - GIMP Tutorial


Hi Everyone, In this video I'm gonna show you How to create Double Exposure Effect with two Images using the Open Source Image Editing Software called GIMP.

Note:
GIMP is the perfect alternative for Photoshop. Hence you can try this same method in Photoshop as well.

Steps:
1. Open two different Images Separately in GIMP (Here one is the Mountain and other one is a woman)
2. Remove background of the Subject and make it transparent
3. Copy the Subject and paste it on the Mountain Image as New Layer
4. Scale the layer to inside the Image
5. Change mode to Multiply so you can see the blending of the two Images
6. Move the Subject to find the good composition
7. Make Layer to Image Size Now
8. Get Alpha on Selection
9. Move the Mountain Layer top in the Layers dialog
10. Add Layer mask to the Mountain layer with Selection
11. Duplicate the Subject Layer
12. Desaturate it
13. Move that Layer to the Top in the Layers dialog
14. Change it Blending Mode to Multiply
15. Add Layer Mask with White Full Opacity
16. Select Paint brush tool with Black as the Foreground Color and with 90% Opacity
17. Brush everything Except the Facial Features
18. Add a Background Color
19. Fill it with the Color from the Image
20. Do some final touches..

That's it. You can now create a Double Exposure Image with a free Software
Thanks for Watching.
Like, Share and Don't Forget to Subscribe

GIMP Tutorial - Stickman Animation with Windows Movie Maker


Hi Everyone, In this video I'm gonna show you How to create Stickman Animation using the Open Source Image Editing Software called GIMP. I am going to animate Stickman Walk Cycle in this video with the Help of GIMP and Windows Movie Maker.

Note:
GIMP is the Alternative for Photoshop. Hence you can try this same method in Photosho as well.

Before getting into this video watch


Steps:
1. Create a Background Image or use one.
2. Create a New Transparent Layer for Each Frames
3. Copy the Head and paste it on other layer while you creating Stickman so that the stickman has uniform head while Animating.
4. Draw the Stickman Frames in each Layers
5. Export each Layers as Frames
6. Open Windows Movie Maker
7. Import all the frames
8. Give Duration for each frames
9. Get an Output

That's it. This is one of the way to create Stickman animation in GIMP

Thanks for Watching. Thumbs up, Share and Subscribe.

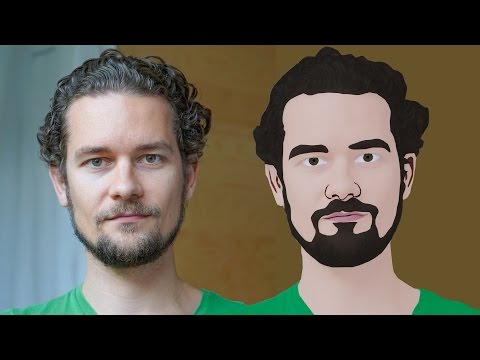
GIMP Cartoon Effect Tutorial

Hi Everyone, In this video I'm gonna show you How to create a Cartoon Version of Yourself or Someone using the Open Source Software...