Hi Everyone, This is Daniel, In this video I'm gonna show you How to fix the C drive running out of space and it will make the c drive full. If you are the video editor and using Adobe Premiere Pro then this video is for you. Adobe saves its media cache files and it is safe to delete.
Media Cache Files mostly saved in C drive unless you changed its location. It has large files and more number of files so your C drive occupying more space and you can't understand why it is happening. Let's see How to cleanup C drive by deleting media cache files
Thanks for Watching.
Also Watch:
Remove Weather from Taskbar Windows 10: https://youtu.be/LBZ9Aa5XayE
Subscribe us:
http://bit.ly/Subscribe-fandD
Monday, July 26, 2021
Tuesday, July 20, 2021
Photopea - Teal and Orange Look | Photopea Tutorial | Photoshop Free Alt...
Photopea Tutorial Teal and Orange Look using the Gradient Map'
Hi Everyone, In this video I'm gonna show you How to get Teal and Orange Look on our photos using free browser editor called photopea
Note:
Photopea is free browser photo editor which looks similar to Photoshop. Hence you can try this same method in photoshop as well.
Steps:
1. Open your image in Photopea
2. Add a New Gradient Map Adjustment Layer
3. Change Teal and Orange Color
4. Change the Mode to Soft Light
That's it. Thanks for Watching
Also Watch:
Raster Mask Tutorial - https://youtu.be/TxzHRXVr-Mo
Subscribe us:
http://bit.ly/Subscribe-fandD
Sunday, July 18, 2021
Remove Weather from Taskbar Windows 10 | Windows 10 Weather Widget
Hi Everyone, This is Daniel from f&D, In this video I'm gonna show you How to remove weather from Taskbar. Windows 10 Updates has this weather widget in taskbar which is not useful for many so if you need to remove the weather widget from the taskbar in Windows 10 then this video is for you.
Steps:
1. Right click on the taskbar
2. Select News and Interests
3. Unselect open on hover to disable the automatic news feed when we hover our mouse over the weather widget
4. Select Turn Off to completely remove the weather widget from the taskbar
That's it. Thanks for Watching
Also Watch
Remove Temporary Files like Windows 10 previous updates: https://youtu.be/RceMppOLIdQ
Subscribe us:
http://bit.ly/Subscribe-fandD
Tuesday, July 13, 2021
Remove Temp Files from Windows 10 | Increase C Drive Space | Remove Prev...
Hi Everyone, In this video I'm gonna show you How to Remove Temporary files from Windows 10 like previous Windows 10 Versions and also previous device driver packages.
Steps:
1. Search Settings 00:12
2. Then Search Delete Temporary files 00:22
3. Select Temporary Files 00:37
4. Click on Remove Files 01:41
5. Restart your System 01:56
That's it. Thanks for Watching
Also Watch:
Live Desktop Wallpapers: https://youtu.be/BTdhNJEyJtA
Subscribe us:
http://bit.ly/Subscribe-fandD
Saturday, July 3, 2021
Saturday, June 26, 2021
Photopea Raster Mask (Layer Mask) Explained
Photopea Tutorial | Raster Mask | Layer Mask in Photoshop
Hi Everyone, This is Daniel from f&D, In this video I'm gonna show you How to use Raster Mask in Photopea which is called as Layer Mask in Photoshop and GIMP.
Note:
Photopea is like the poor man's Photoshop. It looks same as the Photoshop and has many similar tools. So you can use the method in Photoshop as well.
In Layer Mask Black means Transparent and White means Opaque
Thanks for Watching
Also Watch:
Photopea Magic Cut: https://youtu.be/RNcoGkZQgKQ
Subscribe us:
http://bit.ly/Subscribe-fandD
Monday, June 21, 2021
Photopea - Remove Background using Magic Cut | Photopea Online Editor | ...
Hi this is Daniel from f&D, In this video I'm gonna show you How to Remove Background from a Image using the free browser based image editor called Photopea.
Note:
Photopea is mostly like a duplicate version of Photoshop. You can find many Photopea tools similar in Photoshop.
Steps:
1. Open Photopea in your Browser
2. Drag and Drop your Image you need to remove background
3. Go to Select - Magic Cut
4. Use green color to select the foreground
5. Use red color to select the background
6. Make it as new layer
7. Save the image in png format
That's it. Thanks for Watching
Also Watch
Remove Background using pen tool in Photopea: https://youtu.be/RNcoGkZQgKQ
Subscribe us:
http://bit.ly/Subscribe-fandD
Tuesday, June 8, 2021
GIMP - GTA Loading Screen Effect | GTA Art | GTA Instagram | Gimp GTA Ef...
Hi guys, This is Daniel from f&D, In this video We are going to see How to make GTA Loading Screen edit using a photo editing app called GIMP. This edit is trending in Instagram and other social media sites. So Let's get started.
Open your Image in GIMP. Select path tool. Add a New Transparent Layer to fill solid color. Draw a path around the person using the path tool. At the end press ctrl + click to loop the path.
Shift + V to make the path to selection. Press O to select the Color Picker. Pick the color from the skin. Fill the Selection. Hide the layer.
Now we are going to color all other parts like cap, shirts, face features etc. Again select the path tool and draw the path around the cap. We need to draw the path nodes inside the person correctly but outside we don't need to draw correctly because we are going to use the bucket fill to fill with similar color option.
Pick the color from the cap using color picker. Unhide the layer again. Shift + B to select the bucket fill tool. Make sure in the tools option, the affected area should be Fill similar colors. Fill the color inside the cap. You can see the blue color filled only inside the cap. Ctrl + Shift + A to deselect
Hide the Solid color layer to reveal the original image. Select the path tool and draw the path around the opening of the cap. Shift + V to make the path to selection. Pick the color using color picker and press Shift + B for bucket fill tool and fill the selection.
Again Hide the Solid Layer to reveal the original layer. Draw the path for hair and make it to selection, Unhide the solid color layer and fill the hair color.
Some area doesn't get selected so I'm using the pencil tool to fill those areas. Use open and close brackets to increase or decrease the size of the pencil tool
Also do the same process for all the face features. Also draw the path for shirts and make it to selection and fill it with certain colors. Also drawing the strap of the bag. Doing the same thing for currency.
Create a another transparent layer for Dark Shadows. Hide the Solid Color Layer to show the original image. Now draw the path around the Dark Shadows. Shift + V to make selection from path. Make the foreground color to black. Fill the selection using bucket fill tool. Change the mode of the layer to multiply. Change the Opacity to 75%
Shadows on the hand doesn't looks good, so I'm going to correct it. Erase it using the eraser tool. Add another transparent layer for face shadows. Unhide the solid color layer to show the original image.
Now draw the path around the face shadows. Unhide the solid color layer and pick the skin color and fill the selection with skin color. Change the layer mode to Multiply. Change the opacity to 50%. Do this for all the face shadows. I am going to use pencil tool with black color and drawing the shadows.
Change the color to lighter skin color. Draw the lighter face shadows. Because of the low quality image the features are not clear so I need to predict the features and draw.
Again I'm gonna pick the color from skin and draw the shadows in neck areas. Also draw the shadows in the hand. Add another transparent layer for Shirt Shadows. Change the foreground color to black. Draw the Shadows in the black. Change the mode to Multiply and change the opacity of the layer according to your Image. I'm going to change the opacity to 16%
Add Another transparent layer for Dark Shirt Shadows and change the mode to Multiply and change opacity to 30 and draw the dark shirt shadows.
Shadows on the hand doesn't look good so I'm gonna erase the shadows and draw the shadows differently. Then I'm gonna change the color of the currency.
Add a another layer for Highlights. Hide the solid color layer to show the original image. Change the foreground color to white. Draw highlights using the pencil tool. Change the mode to Overlay. Reduce to opacity to 10% to 15%. Again draw the highlights.
Add another highlights layer for dark highlights. Change the mode to overlay. Draw the dark highlights. I usually draw the dark highlights in one side and dark shadows in another side. Change the opacity to 40 - 50%.
Add another transparent layer. Select the black color as foreground color. Change the opacity to 50% and draw the eye darker. Also add details to eye brow and beard.
Again add another transparent layer. Change the mode to multiply. Change the Opacity to 50 and draw the shadows on the other side. Then go to layer and create a New Layer from visible to create a New Layer from a Visible pixel.
Then add a GTA Background Image in the new project. Link for this GTA Background Image is in the description. Now copy the new visible layer and paste it over Gta loading screen image. Press the new layer icon to paste it as new layer. Move, scale and place it.
Again create a New Layer from Visible. Go to Filter - GMIC for adding color preset. I already posted a video how to add gmic plugin in gimp, go and check it out.
Then select colors - color presets and select the color preset which suits for your Image. Then Click OK. Crop the Image. Unselect the current layer only option.
That's it, We now created the GTA Loading Screen Edit using the GIMP. You can add gta logo if you need, also you can add shades and chains if you want. In the next video we are going to see How to convert this to trending instagram reel.
Thanks for watching, If you like this video, Give thumbs up. Subscribe this channel for more future tutorials also press the bell so that you can get instant notification when I upload a video.
Thanks for Watching, BYE!!
Also Watch:
GTA Grove Street Filter for Instagram Snapchat: https://youtu.be/7uX6LGYU0Dg
Subscribe us:
http://bit.ly/Subscribe-fandD
Tuesday, June 1, 2021
3D Cartoon Maker | 3D Cartoon Photo Editor | Cartoon 3D Maker
Convert Your Photo to 3D Cartoon | Make your Face to 3D Cartoon Image using Voila
Hi guys, This is Daniel from f&D, In this video We are going to see How to Convert your photo into 3D Cartoon Image using your Android Phone. We are going to use the app called Voila. So let's get started
Voila App
Open Play Store from your Phone. Search for Voila and Select Voila Al Artist - Photo to Cartoon Face Art Editor and Install it. After Installing Open the App.
Inside the App, We can see option called 3D Cartoon, Renaissance, 2D Cartoon and Caricature. In this video we are going to convert our image to 3D cartoon so click on the 3D Cartoon Option.
You can take photo from your camera or you can choose celebrities photos from online. To select photos from the gallery you need to grant permission for the app.
Now select the image you need to convert. I am going to select one image from my gallery.
Now the App is processing the image to convert into 3D Cartoon. You can see the processed 3D cartoon images. This app gives you three different modes of 3D Cartoon image.
Royalty 3D, Baby 3D and Cartoon 3D select the modes and choose which one suits and looks good for your Image.
Now I'm gonna select the another Image. Now select which mode of 3D Cartoon suits for image. Cartoon 3D looks good for this face so I'm gonna select this mode.
Press the Export icon on the Top right corner to export this 3D Cartoon. This app give you 3 different types of output Image.
I'm gonna select the 3 option. Click on Save to Save this 3D Cartoon Image to your Gallery.
If you need to Remove Watermark from this image you can use the external app called Picsart. Or you can take screenshot from this app
You can also buy the pro version of Voila
for a week, a month or for a year or else you can use 3 day free trial for removing the watermark.
So that's it. This is one of the way you can convert your image to 3D Cartoon.
Thanks for Watching.
Also watch:
Trending Cartoon Photo: https://youtu.be/UoVVpgHg2w8
Subscribe us:
http://bit.ly/Subscribe-fandD
Tuesday, May 25, 2021
Trending Photo Editing | Cartoon Photo Editing | Miniature Cartoon Photo...
Trending Photo Editing | Cartoon Photo Editing | Miniature Cartoon Photo | Caricature Cartoon for Trending Instagram and Facebook posts
Hi Everyone, This is Daniel from f&D In this video, I'm gonna show you How to create this Trending Cartoon Caricature Effect. This photo effect is trending in many social medias like Instagram, Facebook and Whatsapp. In this tutorial we are going to use only one app called Toonapp. Most of them using two apps like ToonApp and Picsart. Now ToonApp itself bring this effect inside it. So Let's get started
ToonApp Link
Open Playstore and search for ToonApp. And Select ToonApp: AI Cartoon Photo Editor, Cartoon Yourself. Install it. If you already installed you need to update this app. Only updated version has this trending cartoon miniature effect.
Open the App. Select the Photo you need to convert to Cartoon. Adjust the image you need to convert to cartoon and press the tick icon in the top right corner. The app will now convert your image to cartoon. Press the icon in the top right corner to proceed.
Now you can see converted cartoon image. Now at the bottom you can see the different preset in that the second is the trending one. Only updated app has this function. Select the second one and Click OK.
Now scale down the cartoon image. Press the earser icon in the top right and erase the body and leave the head. You can use the thickness and blur feature if you want. Now click Apply.
I missed erasing some parts so I'm doing it again. Scale down the head and place it where it need to be. And you can see at the bottom we can see numbers from 1 to 7. Each has different caricature images. You can choose any caricature Image and click Apply
You can also show the Mini Image and turning on the Mini Image Option. If you need to remove the ToonApp Watermark you can buy the pro version or you can use 3 Days Free Trial.
Press Save icon in the bottom to save it your Storage. If you want to remove watermark you can also use the external app like picsart or else you can take screenshot from the app itself.
That's it. Thanks for Watching.
Also Watch:
Convert Image to Cartoon in one click: https://youtu.be/avswN2M5F-0
Subscribe us:
http://bit.ly/Subscribe-fandD
Saturday, May 22, 2021
GTA San Andreas Grove Street Snapchat Filter | GTA Characters Filter | I...
Hi guys, This is Daniel from f&D in this video I'm gonna show you How to get GTA Grove Street Snapchat Filter. In this filter we can see the characters from GTA San Andreas moving and talking with each other in Augmented Reality. This filter is trending in Instagram, TikTok and Snapchat. This is the Snapchat Filter so you need to install Snapchat on your Phone.
Let's see How to use this filter
First you need to install Snapchat on your Mobile. Go to Playstore and Install Snapchat. If you already installed Snapchat then you need to update the app if it is already up to date then Open the App.
Select the Camera option in your Snapchat. The Select the effects option. In the Top left corner you can see the search icon click on that. And search for Grove Street and Select the grove street world by Nikita treshalov.
Now you can see the GTA Characters moving and talking to each other in your Camera. Zoom and place the GTA Characters according to your surface. You can also rotate the characters by pressing with one finger and rotating with other.
You can also move the camera and be creative with your video. Now to record the video press and hold the record button. Now press the save button in the bottom to save this snap.
After saving the snap you can find the saved snap over here. And select the recently saved snap and download it to your Storage. So by this method you can create the trending GTA Grove Street TikTok and Insta Reels
So that's it. Thanks for Watching. If you like this video, give thumbs up. Subscribe this channel for more future tutorials, Also press the bell icon so that you can get instant notification when I upload a Video. Thanks for Watching.. BYE!!
Also Watch:
Runaway Aurora Instagram Filter Tutorial: https://youtu.be/BcWU39LePog
Subscribe us:
http://bit.ly/Subscribe-fandD
Subscribe to:
Posts (Atom)
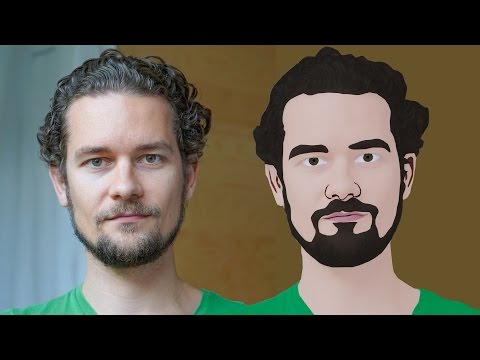
GIMP Cartoon Effect Tutorial
Hi Everyone, In this video I'm gonna show you How to create a Cartoon Version of Yourself or Someone using the Open Source Software...
-
Make your Image sing and vibe for a Song using an Android App Hi Everyone, This is Daniel from f&D. In this video, We are going to see ...
-
Photopea - Neon Text Effect Tutorial Hi Everyone, In this video I'm gonna show you How to make Neon Text Effect in Photopea. This phot...

