How to create a Text Portrait in Photopea | Portrait made of Text
Hi Everyone, In this video, I'm gonna show you How to create a Text Portrait in Photopea. This is the amazing typography poster tutorial.
Note:
Photopea is the Browser Alternative for Photoshop. Hence you can try this same method.
Steps:
1. Open Photopea and Drag and Drop your Image. Sample Image
2. Remove Background using Magic Cut - https://youtu.be/TTQMYEkdKro
3. Add a Black Color Fill below the Image
4. Add a Black and White Adjustment Layer
5. Add a Curves Adjustment Layer to add contrast
6. Add a New Layer and add rectangular selection to the half of the face and fill it with the black color
7. Add a Text to the half of the face
8. Make the Text to Group and make the group to layer
9. Make the Text to Selection
10. Select the Half Black Layer and add a raster mask.
That's it. Thanks for watching.
Also Watch:
How to Turn Summer into Winter Scene: https://youtu.be/ETDy9b64MwQ
Subscribe us:
http://bit.ly/Subscribe-fandD
Sunday, December 26, 2021
Saturday, December 18, 2021
How to Turn Summer into Winter in Photopea
Convert Summer Scene to Winter Scene in Photopea
Hi Everyone, This is Daniel from f&D. In this video, I'm gonna show you How to convert a summer scene into winter scene using Photopea.
Note:
Photopea is the Browser Alternative for Photoshop. Hence you can try this same method in Photoshop as well.
Steps:
1. Open your Image in Photopea
2. Add a Black and White Adjustment layer with Luminosity Blend Mode
3. Change the Red and Green Value to 200
4. Then add a Hue and Saturation Adjustment Layer
5. Reduce the Saturation to -90 and Increase the Lightness value to 90 in both the green and yellow to affect only the grass and trees
6. Go to Blending Option of the Hue and Saturation layer and make it affect only the Highlights of the Image
7. Then we can increase the saturation of the remaining colors if we want to.
That's it. Thanks for Watching.
Also Watch:
Photopea Galax Face Logo: https://youtu.be/2aRdiXcUox4
Subscribe us:
http://bit.ly/Subscribe-fandD
Saturday, December 11, 2021
Photopea - Galaxy Logo Design from Face | Browser Photoshop
Photopea - Galaxy Logo from Face
Hi Everyone, This is Daniel from f&D. In this video I'm gonna show you How to create Galaxy Logo Design from a face using the free and browser based photo editor called Photopea
Note:
Photopea is the browser alternative for Photoshop. Hence you can try this same method in Photoshop as well
Steps:
1. Create a New Image with 1920x1080. FACE
2. Drag and Drop your Image
3. Extract Face from it
4. Add Threshold
5. Extract the Black areas from the threshold to extract the face
6. Add Galaxy Image. GALAXY
7. Clip Mask it with face
That's it. Thanks for Watching.
Also Watch:
Duotone Effect: https://youtu.be/OeKMwOcde_E
Subscribe us:
http://bit.ly/Subscribe-fandD
Subscribe to:
Comments (Atom)
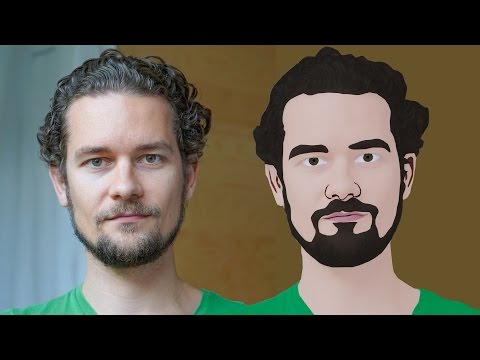
GIMP Cartoon Effect Tutorial
Hi Everyone, In this video I'm gonna show you How to create a Cartoon Version of Yourself or Someone using the Open Source Software...
-
Make your Image sing and vibe for a Song using an Android App Hi Everyone, This is Daniel from f&D. In this video, We are going to see ...
-
Photopea - Neon Text Effect Tutorial Hi Everyone, In this video I'm gonna show you How to make Neon Text Effect in Photopea. This phot...

