Tuesday, May 25, 2021

Trending Photo Editing | Cartoon Photo Editing | Miniature Cartoon Photo...


Trending Photo Editing | Cartoon Photo Editing | Miniature Cartoon Photo | Caricature Cartoon for Trending Instagram and Facebook posts Hi Everyone, This is Daniel from f&D In this video, I'm gonna show you How to create this Trending Cartoon Caricature Effect. This photo effect is trending in many social medias like Instagram, Facebook and Whatsapp. In this tutorial we are going to use only one app called Toonapp. Most of them using two apps like ToonApp and Picsart. Now ToonApp itself bring this effect inside it. So Let's get started

ToonApp Link Open Playstore and search for ToonApp. And Select ToonApp: AI Cartoon Photo Editor, Cartoon Yourself. Install it. If you already installed you need to update this app. Only updated version has this trending cartoon miniature effect. Open the App. Select the Photo you need to convert to Cartoon. Adjust the image you need to convert to cartoon and press the tick icon in the top right corner. The app will now convert your image to cartoon. Press the icon in the top right corner to proceed. 
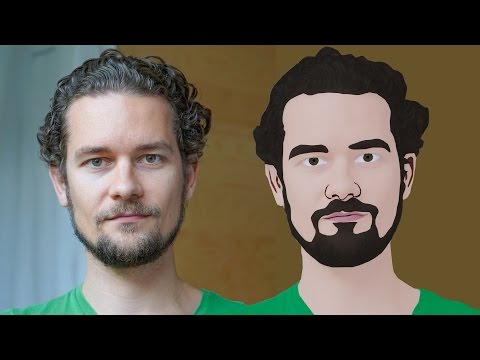
Now you can see converted cartoon image. Now at the bottom you can see the different preset in that the second is the trending one. Only updated app has this function. Select the second one and Click OK. Now scale down the cartoon image. Press the earser icon in the top right and erase the body and leave the head. You can use the thickness and blur feature if you want. Now click Apply. I missed erasing some parts so I'm doing it again. Scale down the head and place it where it need to be. And you can see at the bottom we can see numbers from 1 to 7. Each has different caricature images. You can choose any caricature Image and click Apply You can also show the Mini Image and turning on the Mini Image Option. If you need to remove the ToonApp Watermark you can buy the pro version or you can use 3 Days Free Trial. Press Save icon in the bottom to save it your Storage. If you want to remove watermark you can also use the external app like picsart or else you can take screenshot from the app itself. That's it. Thanks for Watching. Also Watch: Convert Image to Cartoon in one click: https://youtu.be/avswN2M5F-0 Subscribe us: http://bit.ly/Subscribe-fandD


Saturday, May 22, 2021

GTA San Andreas Grove Street Snapchat Filter | GTA Characters Filter | I...


Hi guys, This is Daniel from f&D in this video I'm gonna show you How to get GTA Grove Street Snapchat Filter. In this filter we can see the characters from GTA San Andreas moving and talking with each other in Augmented Reality. This filter is trending in Instagram, TikTok and Snapchat. This is the Snapchat Filter so you need to install Snapchat on your Phone. Let's see How to use this filter First you need to install Snapchat on your Mobile. Go to Playstore and Install Snapchat. If you already installed Snapchat then you need to update the app if it is already up to date then Open the App. Select the Camera option in your Snapchat. The Select the effects option. In the Top left corner you can see the search icon click on that. And search for Grove Street and Select the grove street world by Nikita treshalov. Now you can see the GTA Characters moving and talking to each other in your Camera. Zoom and place the GTA Characters according to your surface. You can also rotate the characters by pressing with one finger and rotating with other. You can also move the camera and be creative with your video. Now to record the video press and hold the record button. Now press the save button in the bottom to save this snap. After saving the snap you can find the saved snap over here. And select the recently saved snap and download it to your Storage. So by this method you can create the trending GTA Grove Street TikTok and Insta Reels So that's it. Thanks for Watching. If you like this video, give thumbs up. Subscribe this channel for more future tutorials, Also press the bell icon so that you can get instant notification when I upload a Video. Thanks for Watching.. BYE!! Also Watch: Runaway Aurora Instagram Filter Tutorial: https://youtu.be/BcWU39LePog Subscribe us: http://bit.ly/Subscribe-fandD

Wednesday, May 19, 2021

Photopea - Remove Background using Pen Tool | Browser Photoshop


Photopea Tutorial 1 Hi Everyone, This is Daniel from f&D, In this video I'm gonna show you How to remove background and extract the person or objects using pen tool in Photopea Note: Photopea is the free alternative for Photoshop which can be used in any device because it is browser based. Steps: 1. Drag and Drop the Image inside Photopea 2. Select Pen Tool 3. Draw the Anchor Points around the subject 4. Change the fill to none 5. Change the Shape to Path 6. Make Selection 7. Ctrl + J to Duplicate the Layer with Selection 8. Hide the Original Layer That's it. Thanks for Watching Also Watch: Alternative to Photoshop - The Photopea : https://youtu.be/SihTdfPWOxk Subscribe us: http://bit.ly/Subscribe-fandD

GIMP Cartoon Effect Tutorial

Hi Everyone, In this video I'm gonna show you How to create a Cartoon Version of Yourself or Someone using the Open Source Software...