Wednesday, July 31, 2019
How to create 3D Frame Effect in Picsart
Picsart Tutorial #29
Hi Everyone, In this picsart tutorial we can learn How to create 3D Frame Effect using the free Mobile Image Editing App called Picsart
Also Watch:
Picsart Sketcher Effect: http://bit.ly/picsart_sketcher
Subscribe us:
http://bit.ly/Subscribe-fandD
Tuesday, July 30, 2019
GIMP - Glowing Animals | G'MIC
GIMP Tutorial #103
Hi Everyone, In this video, We are going to learn about How to create Glowing Animals effect using the GMIC Plugin in GIMP. This method uses Rodilius Filter in GMIC Plugin which is the Alternative to Fractalius Plugin (Photoshop)
Also Watch:
Sketch Yourself: http://bit.ly/sketch_effect_gimp
Subscribe us:
http://bit.ly/Subscribe-fandD
Monday, July 29, 2019
How to create Sketch Yourself Effect in GIMP
GIMP Tutorial #102
Hi Everyone, This is Daniel, In this video I'm gonna show you How to create a Effect that look like that you are drawing yourself using GIMP or else you can also try pencil drawing sketch effect using GIMP
Note:
GIMP is the Alternative for Photoshop. Hence you can try this same method in Photoshop as well.
Step:
1. Open Your Image in GIMP
2. Remove Background and add a Radial Gradient Background
3. Duplicate the Subject Layer
4. Desaturate it
5. Duplicate again
6. Then Invert it by going to Colors - Invert
7. Change the Mode to Dodge
8. Then go to Blur and Blur Value until you are satisfied
9. Then Merge Down
10. Add Layer Mask with Black Full Transparency
11. Change the Foreground Color to White and Erase the Layer Mask to get the draw yourself effect in GIMP
Thanks for Watching..
Also Watch:
Fire Effect in GIMP: http://bit.ly/fire_effect_gimp
Subscribe us:
http://bit.ly/Subscribe-fandD
Friday, July 5, 2019
Picsart Tutorial - VHS Glitch Effect || Picsart Image Editing
Hi guys, This is Daniel, In this video I'm gonna show you How to create VHS Glitch Effect using the Free Mobile App called Picsart
Picsart is the Free Image Editing App for Mobile Phones which is similar to Photoshop in PC. It is Available for both Android and iOS
Steps:
1. Open your Image in Picsart
2. Go to Add Photo and Add Same image with Default Colorize Filter and Change the Image blend mode to Lighten
3. Move the position of the Image to make it look like its glitching
4. Again add photo, this time with the same colorize effect but with the hue value to the maximum
5. Again position the Image to make it look like its glitching
6. Add the vhs glitch and overlay stickers from the picsart sticker library as shown in the video
7. Then add noise effect
That's it... Thanks for Watching.
If you like this video, Give thumbs up and Subscribe this channel for ore future Tutorials
Also Watch:
Water Ripple Effect: http://bit.ly/water-ripple-picsart
Subscribe us:
http://bit.ly/Subscribe-fandD
Tuesday, July 2, 2019
Water Effect in Picsart | Picsart Editing Tutorial | Picsart Photo Editing
Hi guys, This is Daniel, In this video I'm gonna show you How to create Water Text Effect using the Free Mobile App called Picsart
Picsart is the Free Image Editing App for Mobile Phones which is similar to Photoshop in PC. It is Available for both Android and iOS
Images Used : Man
Picsart App: Android || iOS
Also Watch:
Picsart Own Wall Editing : http://bit.ly/picsart-own-wallSubscribe us:
http://bit.ly/Subscribe-fandD
Monday, July 1, 2019
Fire Effect in GIMP | Photoshop Alternative | #101
Hi Everyone, This is Daniel, In this video I'm gonna show you How to create Fire Effect using the free and open source Image Editing Software called GIMP
Note:
GIMP is the perfect Alternative for Photoshop. Hence you can try this same method in Photoshop as well.
Steps:
1. Open your Image in GIMP
2. Change the Background if you want
3. Extract the hand and paste it as separate layer
4. Add Rock texture to the Hand
5. Add Cracks to the Rock Textures
6. Add Fire Images to the Hand
7. Add LUT using GMIC plugin
Images Used:
Rock Texture
Cracks
Sky 1 Sky 2
Fire: 1 2 3 4 5 6 7 8 9 10
Sparks
How to create Rock Texture in GIMP: http://bit.ly/gimp-rock
How to install G'MIC Plugin in GIMP: http://bit.ly/gmic-plugin
That's it. Thanks for Watching. If you like this video give thumbs up, Subscribe this channel for more future tutorials.
Also Watch:
GIMP - Change the Perspective of the Image using Depth Map: http://bit.ly/gimp_depthmap
Subscribe us:
http://bit.ly/Subscribe-fandD
Subscribe to:
Comments (Atom)
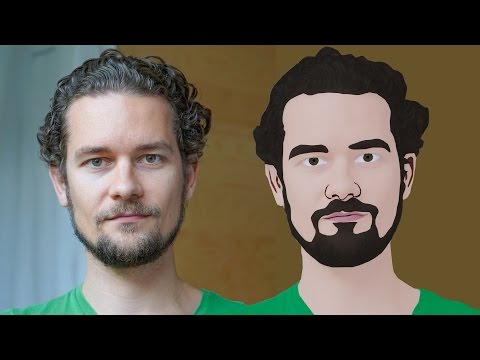
GIMP Cartoon Effect Tutorial
Hi Everyone, In this video I'm gonna show you How to create a Cartoon Version of Yourself or Someone using the Open Source Software...
-
Make your Image sing and vibe for a Song using an Android App Hi Everyone, This is Daniel from f&D. In this video, We are going to see ...
-
Photopea - Neon Text Effect Tutorial Hi Everyone, In this video I'm gonna show you How to make Neon Text Effect in Photopea. This phot...

